In fluid systems, clamps are small components that play a big role in maintaining secure, leak-free connections. However, removing a clamp the wrong way can damage hoses, affect fittings, and lead to costly repairs. With the right approach, clamps can be removed cleanly without harming the system.
If you are working with precision clamps such as Oetiker ear clamps, this guide will help you remove them safely and efficiently.
For any doubt & Query write us at: sales3@natronequipments.com
Why Proper Clamp Removal Matters?
Clamps are designed to hold tightly under pressure. Removing them carelessly can cause damage that affects system performance later.
Improper removal can:
- Damage hoses or fittings
- Create leaks during reinstallation
- Increase maintenance and replacement costs
A careful method helps maintain the integrity of your system and reduces unnecessary downtime.
Tools You Will Need Remove Clamps
Before starting, make sure you have the right tools ready. This helps you work with better control and reduces the risk of mistakes.
You will need side cutters or end nippers, a flathead screwdriver, and ideally clamp removal pliers for more precise work. Safety gloves and eye protection are also recommended.
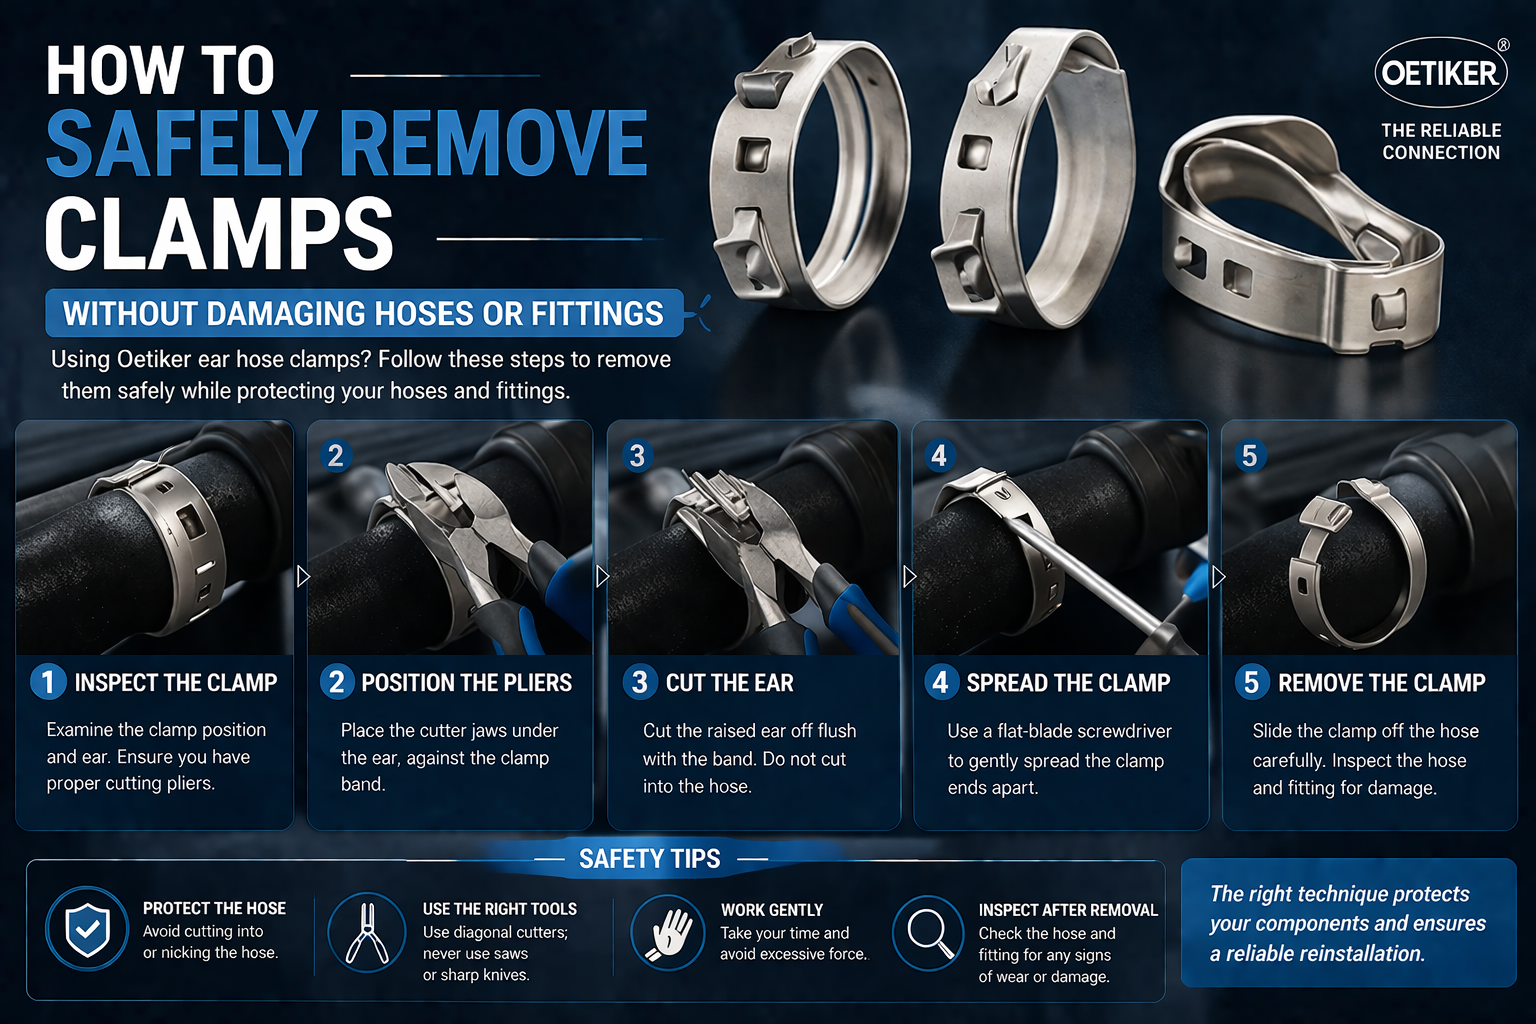
Step-by-Step Guide to Removing Clamps
Step 1: Power Down and Depressurize
Always switch off the system and release any internal pressure before starting. Even a small amount of trapped pressure can make removal difficult and unsafe.
Step 2: Locate the Clamp Ear
Most Oetiker-style clamps have a raised section known as the ear. This is the part that was compressed during installation and is the correct point to cut.
Step 3: Cut the Ear Carefully
Use side cutters to cut the ear gently. Apply controlled pressure and avoid going too deep. The goal is to cut the clamp, not damage the hose underneath.
Step 4: Loosen the Clamp
Insert a flathead screwdriver into the cut section and twist slightly. This helps open the clamp without forcing it. Let the clamp loosen naturally rather than pulling it apart aggressively.
Step 5: Remove the Clamp
Once loosened, the clamp should slide off easily. If it does not, check if the ear has been fully cut. Avoid pulling forcefully as this can damage the hose.
Common Mistakes to Avoid While Removing Clamps
Many issues happen due to small mistakes during removal. Cutting too deep can damage the hose. Applying too much force while prying can distort fittings. Skipping depressurization can create safety risks. Trying to reuse single-use clamps can lead to leaks later.
Tips for Safe and Clean Clamp Removal
Working with proper tools gives you better control. Good lighting helps you see exactly where to cut. Always keep a replacement clamp ready before removal so the system can be reassembled without delay. If you are new, practicing on a spare clamp can help you build confidence.
Can Oetiker Clamps Be Reused?
Most Oetiker Ear Clamps are designed for single use. Once removed, they should be replaced with a new clamp to ensure a proper and secure seal. Reusing them can lead to weak connections and potential leakage.
Choose the Right Clamps with Support from NESPL
Using the correct clamp is just as important as removing it properly. At NESPL, we are official suppliers of Oetiker and we supply original Oetiker Clamps designed for reliable performance in industrial and fluid systems.
We help you select the right clamp based on your application, hose type, and pressure requirements so that installation and maintenance remain smooth and dependable.
Final Thoughts
Removing clamps safely is about control and precision, not force. With the right tools and a careful approach, you can remove clamps cleanly without damaging hoses or fittings.
A proper removal process ensures your system stays reliable and ready for reassembly, helping you avoid unnecessary repairs and downtime.